Application Support – User Guide
Introduction
Tracking a patient’s whereabouts, time in care, and visit information are important tasks to ensure quality service and treatment in any healthcare organization. PatientTrak assists healthcare personnel by providing an easy-to-use tool to record visit data from door to discharge, allowing for better management of patient flow in a real-time manner.
Terms
The following terms will be used throughout the User Manual:
• Areas – Usually a physical space or room such as “Admissions” or “Waiting Area”. Areas can be comprised of two or more rooms such as “Lab Room 1 through Lab Room 5” which can.
• Rooms – A physical location at which an individual patient can receive care. Rooms may be defined as beds in some healthcare organizations. Rooms are often found within an area.
• Discharged Patients – Patients who are no longer being tracked and have been removed from the Tracking Board
• Tracking Board (TB) – Interactive grid in PatientTrak that tracks Patients as they are arrived into an area or room, often a lobby or waiting room. The User can further move the Patient to different locations as well as assign Activities to them, add notes and associate Alerts.
• Alerts – To communicate patient needs or special designations between staff members using the Tracking Board. Alerts can further describe a patient’s status in a graphical way.
• Scheduled Patients – Patients that have not yet been arrived into the Tracking Board but are present within a list of patients that have scheduled appointments.
• Type Codes – This label can be renamed as needed to fit your organization. For instance, they may be used as CPT codes, ICD or Service Codes. The Type Codes can be used as location information or to identify a specific modality. Type codes can be associated to patients.
• Organizational Settings – An administrative section where Tracking Board and Public Screen fields can be enabled/disabled or relabeled as needed.
• Activities – Patient visits involve different events that may be recorded in the patient tracking system, such as “Patient Moved”, “Lab Ordered”, or “Patient Discharged”, for example. The time of each Activity is also recorded and used for analysis and reporting.
• HL7 – Health Level-7 or HL7 refers to a set of international standards for transfer of clinical and administrative data between software applications used by various healthcare providers. These standards focus on the application layer, which is “layer 7” in the OSI model.
System Login
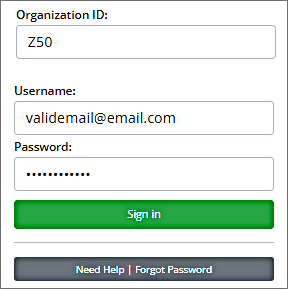
To log onto your patient tracking system, simply point your web browser to www.app.www.patienttrak.net. Enter your Organization ID and then Login ID and Password, and then click “Login” to proceed.
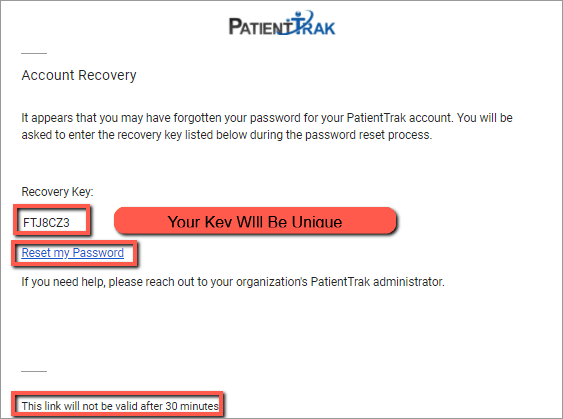
If you have forgotten your password, use the “Need Help | Forgot Password” button on the home page.
Enter in your valid email address associated with your account.
You will receive an email with a Recovery Key. Remember the Recovery Key and then click on the “Reset my Password” link in the email. NOTE: The link will expire after 30 minutes. If the link has expired, please start the Forgot Password process over.
On the next page, enter in your Recovery Key.
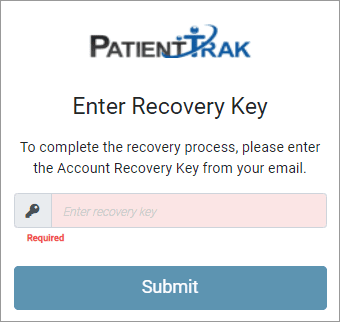
If successful, the system will now ask you to change your password.
My Profile
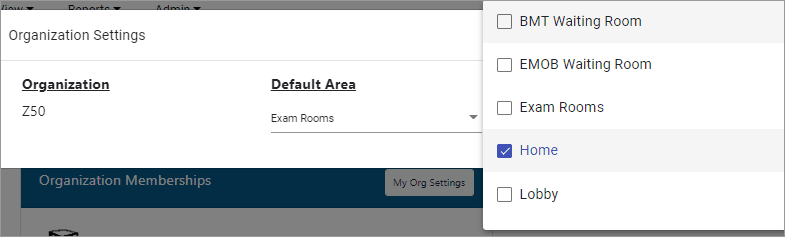
The My Profile menu can allow you to change your password for logging into PatientTrak. Also offered on the page is the ability to select a default Tracking Board area/room from the drop-down under My Org Settings. If you access the Tracking Board upon logon or through “View” you will be directed to that area as a default.
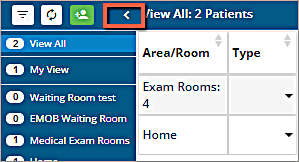
My View Setup
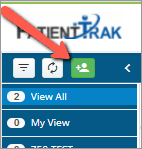
All users are required to configure their Default Area and My View settings. Users can check the boxes for the available areas which in turn becomes your “My View”. In this example below, the User could select one or more of the available areas by checking the boxes. Once saved, the User then selects “My Tracking View” on the Tracking Board. See My Tracking View below.
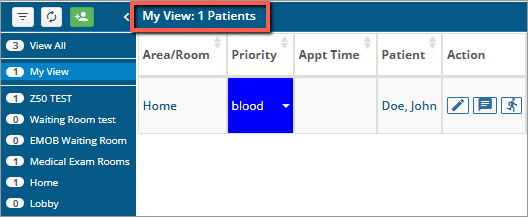
My View
In this example the User set up their “My Profile” to view only the “Home” area. When the User clicks “My View”, they will only see the areas/rooms within their selection and any associated patients. The idea behind using this feature is so that you only see what you need to see and or are responsible for.
Adding Patients
Manually Adding a New Patient
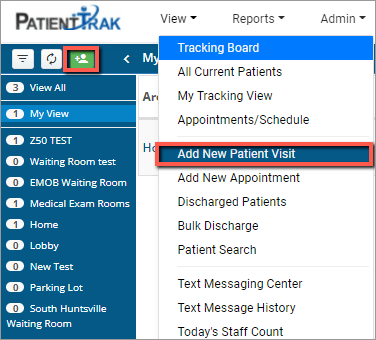
A user can add a patient manually by either selecting the green “Add New Patient or Appointment” icon, or from the View drop down menu.
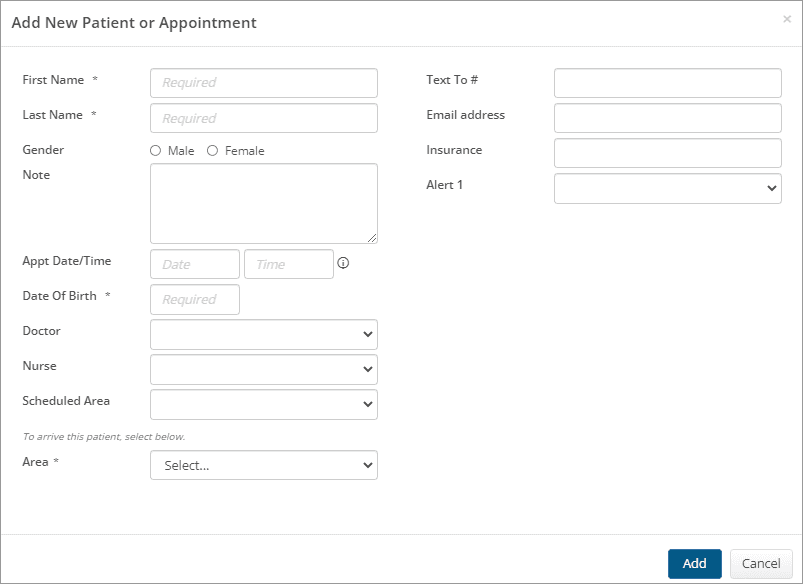
• When adding a new Patient note that the “*” means it is a required field.
• The Patient record can be set up to fill a few or several fields. These fields are configured and labeled from within the Organizational Settings.
Note: If a Kiosk is used, the fields can be populated during the Patient sign-in. As an example: Kiosk Question: Do you have Allergies? YES/NO. The Patient picks YES and the patient record will show YES.
• Several other drop-downs allow the User to select the doctor or nurse that will be working with the Patient.
• Some fields are free-text fields and allow the User to type information in manually.
TIP: Most of these fields can also be shown on the Tracking Board if enabled, this is done from Organizational Settings.
Add New Appointment
• The menu to add an appointment is the same as adding a Patient in manually except for the “time & date” requirement.
• Appointments are added to the Appointments/Schedule table and can be edited there.
• Patient Appointments are not associated with an area and are shown as “N/A”. Once the person is “arrived”, they can be placed into an area, often this is a Lobby or Waiting Room. The User can move the patient to an Area or if the patient signs in through the kiosk, they are automatically arrived to an area.
Patient Detail Page
• Patient Activities and Text Message History both reside alongside the Patient Record and can also be accessed through the Patient Detail page by clicking on the name of the patient.
• The Activities Tab shows you each and every activity in the order it was added to the Patient. These activities include “system” and “User”.
• The text-messaging history tab will provide a list of each text message sent out (Date/From-To & Message). This tab will only show if the Text-Messaging feature is enabled for the application.
• The Change Log shows a user all of the changes that have been made to a patient.
If you have questions please contact PatientTrak Support. (414) 455-6619.
Appointments and Scheduling
The Appointments / Schedule table can be updated several ways. Either manually by adding a single patient appointment at a time or through a manual or automated import function. When manually adding an appointment you are required to select a date and time, and you will not select an area or room until the Patient is physically arriving and is placed on the Tracking Board.
Appointments via CSV
The manual import function requires that you import a CSV file through the “Import Appointments button”. PatientTrak Support can provide you with the format requirements. Fields such as; First & Last Name / DOB / Provider / Appt. Date & Time / Service Type / Notes / Phone #, can be pulled from the file to populate the patient information. This information is shown then available in the Appointments/Schedule table.
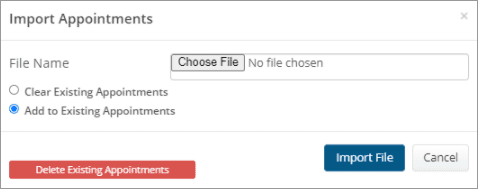
Note: CSV files are imported by a PatientTrak User and are often supplied by an electronic health record (EHR) system that can export appointments for patients. Only Admins are allowed to delete appointments.
Note: Only PatientTrak Administrators are allowed to delete existing appointments.
Automated Appointments (HL7)
The Automated Import functionality can be achieved by sending a file from your electronic medical record (EMR) to PatientTrak’s secure SFTP server where it is processed and the Appointments/Schedule table updated in PatientTrak. PatientTrak Support will also provide a detailed document outlining the HL7 requirements. HL7 is a set of international standards for transfer of clinical and administrative data between software applications used by various healthcare providers. If you have question’s please contact PatientTrak Support.
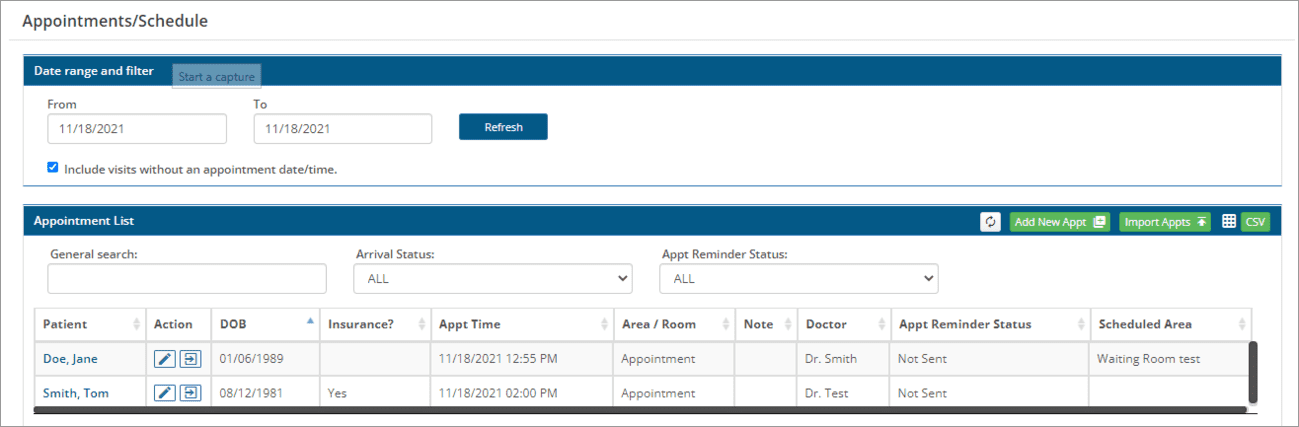
The Appointments / Schedule table can be both filtered and sorted by date if needed to isolate the information. A “Search” box is also available and can further help you see only specific information you have typed in.
Note: You can exit the menu and return and the “search” criteria will still be there unless deleted.
Add Patients and Appointments From The Tracking Board
From the Tracking Board you can click to add a Patient. If you have the scheduling & appointments feature enabled you will also be able to add an Appointment from the green icon. A window will now allow you to choose if it is an appointment or not. If you do not put an appointment date/time in, you are required to arrive the Patient into an area. When you select an Area the “*” is removed from the Appt Date/Time Field. If you put an appointment in then you can just click Add and the record will be added to the appointments/schedule table.
Online Reservation Settings
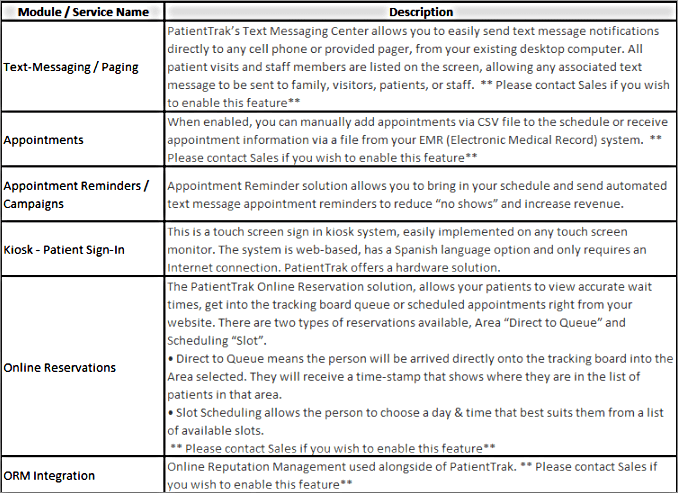
The PatientTrak Online Reservation solution allows your patients to view accurate wait times, get into the tracking board queue or scheduled appointments right from your website. There are two types of reservations available, Area “Direct to Queue” and Scheduling “Slot”.
• Direct to Queue means the person will be arrived directly onto the tracking board into the Area selected. They will receive a time-stamp that shows where they are in the list of patients in that area.
• Slot Scheduling allows the person to choose a day & time that best suits them from a list of available slots.
** Please contact PatientTrak Support if you wish to enable this feature**
Under Admin > Online Reservation Settings, you can set up your questions and enable fields that you wish to show a patient when they make an online appointment.
• These questions can be enabled or disabled to meet your needs.
• Select whether they are Yes/No or Free Text fields for patient input.
• The information captured can also be displayed on the tracking board if desired.
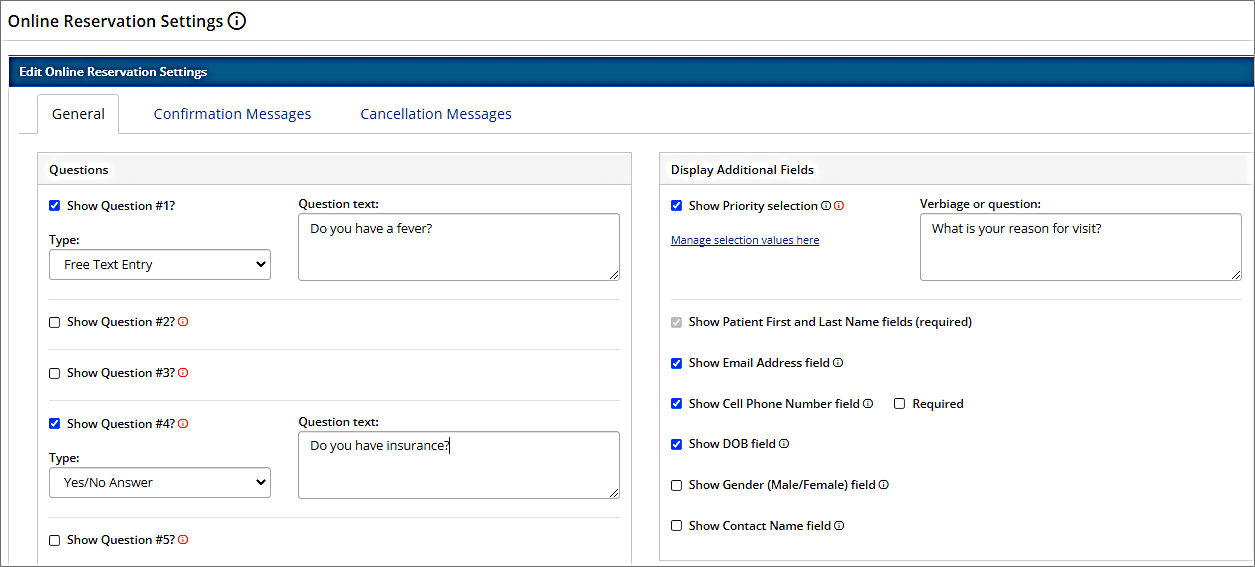
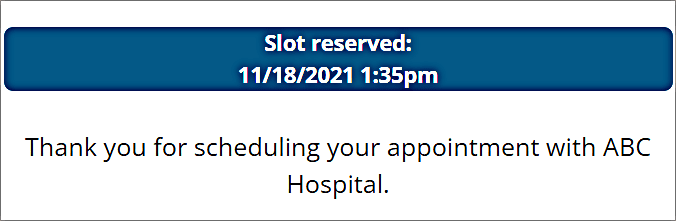
The form below is an example of what a patient will see when scheduling an appointment online.
Once you reserve your spot a message will pop up letting you know your spot has been processed.
Once the form is completed and submitted, the patient is added to the Appointments/Schedule table.
NOTE: If “Consider non-online appts for slot availability” is checked, any appointments in the Appointment list (add manually or by schedule import) will also be recognized and that time slot debited from the drop-down on the Slots schedule form.
Setting up Online Configuration for “Direct to Queue”
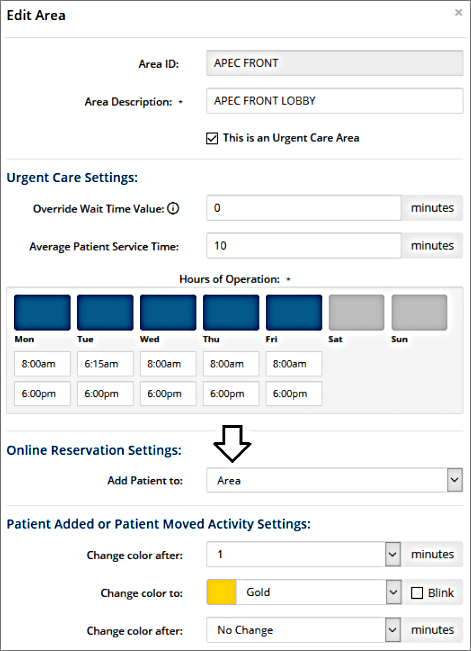
Under Admin > Areas select the Area that will be used and click “edit”. Note: This Area has to be set up as an Urgent Care. If this is not available please contact PatientTrak Support for help.
In this menu you will see that the checkbox for Urgent Care is enabled. This provides the “Online Reservation Settings” drop-down. Select “Area” for “Direct to Queue” type. Save your changes.
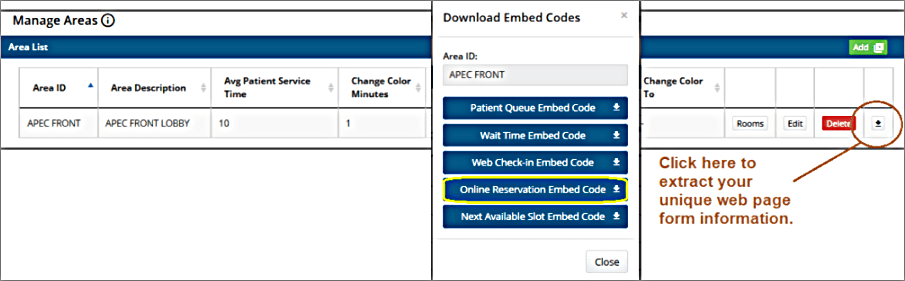
Once the questions have been completed and the setup has been enabled you can now extract the web site (iframe tag) information. Click on the highlighted button which allows you to download a text file with iFrame tag information. Place this iFrame tag where you want it on your website
Setting up Online Configuration for “Slot Scheduling”
Under Admin > Areas select the Area that will be used and click “edit”. Note: This Area has to be set up as an Urgent Care. If this is not available please contact PatientTrak Support for help.
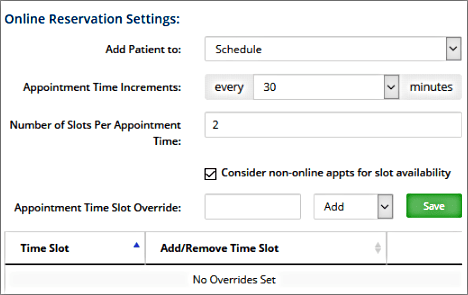
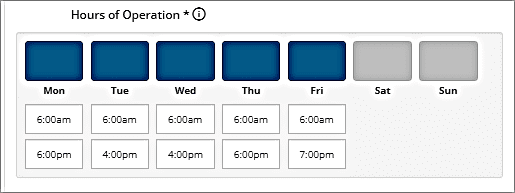
If Slot scheduling is desired then select “Schedule” from the drop-down. By doing so you will be able to configure the following; Appointment Time increments (length of Appts.), How many slots are open for each Appt. (5, 10, 15, 20, 30, 60min) and whether to also consider other Appts that may be in the schedule as part of the Slots. The hours of operation are required so that the availability can be shown on the web form.
When the hours are set, only those hours will be recognized as available slots, all other hours will be blocked out. This setting will be in place week by week, month by month.
A “Slot Override” feature is available, this allows you to add or remove a slot for any of the available times. For instance. If there normally two Slots open for 12pm you can increase it by “adding” a Slot for that time period. Likewise, if 12pm is a time when there may be less resources available you might only need 1 Slot or want to remove that time Slot completely.
In this list, 12pm is added to an already available 2 Slots making 3 Slots available. Also in this list the removal of 1pm. When we look at the available times we will see that 1pm is not available for selection. Because there the configuration was set for 2 Slots per every 30min, you would need to create 2 overrides for 1pm as shown.

Once the questions have been completed and the setup has been enabled you can now extract the web site (iframe tag) information.
Appointment Options
Holiday Calendar
The purpose of this enhancement is to allow locations to set selected days where appointments cannot be scheduled.
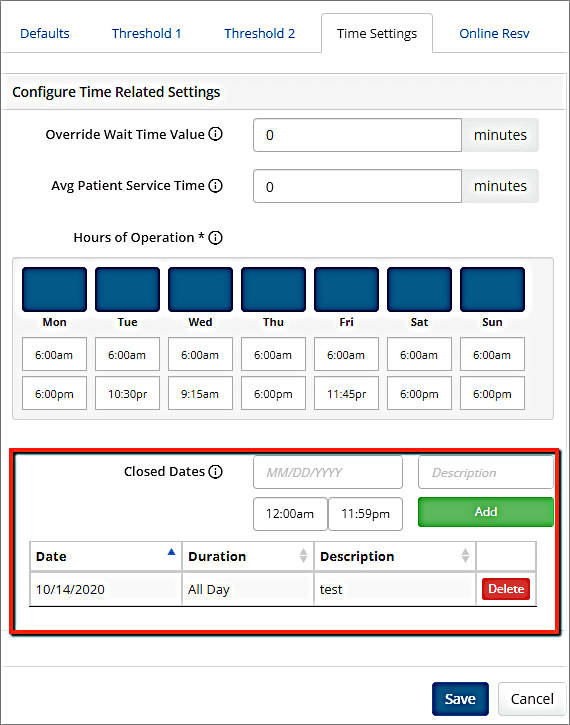
-Select AREA from the Admin dropdown menu
-Select EDIT from the desired area.
-Select the TIME SETTINGS tab.
-At the bottom of the page, you will see the option to enter in any days to have that area closed for online reservations.
-Enter in the date and description, click on ADD, and then the SAVE button.
Booking Cutoff Time
The purpose of this enhancement is to allow locations to define the number of minutes before a time slot at which appointments can no longer be booked. For example, if set to 5 minutes, at 2:55 pm a patient will be unable to book a 3:00 pm appointment.
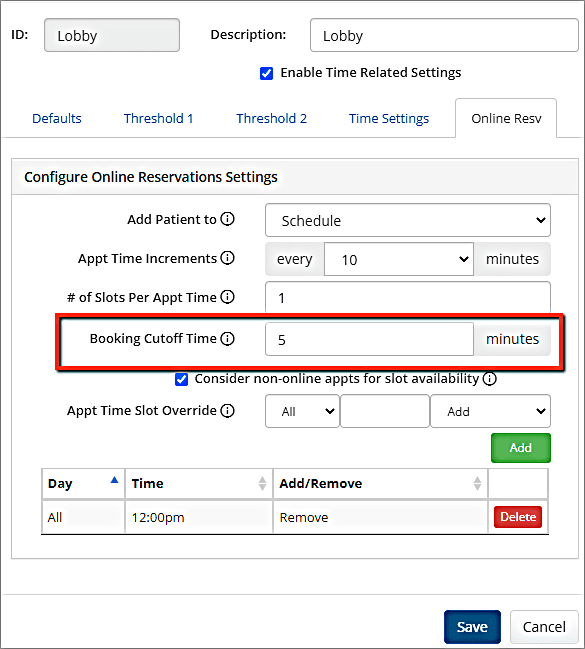
-Select AREA from the Admin dropdown menu.
-Select EDIT from the desired area.
-Select the Online Resv. tab.
-In the Booking Cutoff Time field, enter in how many minutes before an appointment time the booking may no longer occur.
-Click on the SAVE button.
Appointment Time Slot Override
The purpose of this enhancement is to allow locations to override time slots by adding or removing time slots, by day of week. For example, on Saturdays, the facility may only want two time slots for each half hour from 8:00 am-12:00 pm, but may only want one time slot on Saturdays from 12:00 pm-4:00 pm.

Select AREA from the Admin dropdown menu, and then select EDIT from the area that has the online reservations.
The Appt Time Slot Override allows you to override the number of appointment slots. Select the day of week for which the override should occur. Select the time slot for which the override should occur. Select whether to add or remove the time slot.
Click on Save when finished.
Discharged Patients
Once a patient is arrived onto the Tracking Board, they can then be “Discharged” as needed. This can be achieved by clicking on the Tracking Board Action Column Icon. Discharging a patient removes them from the Tracking Board but does not delete them completely.
If you need to access a patient that has already been discharged, you can go to View> Discharged Patients and look them up by date range or service codes. Once located you can edit information or even re-add them to the Tracking Board by selecting an area and then saving.
Bulk Patient Discharge
If you have a need to remove multiple patients either from one area or all areas, there is a Bulk Patient Discharge tool. Go to View> Bulk Discharge, then select what area(s) you want to discharge the patients from. Important: This tool will remove “all” patients from the selected area based on your time range selection. The Bulk Discharge is predicated on “when/what date” the Patient was added to the tracking board. Example: You can clear Patients from the tracking board from yesterday but not affect patients today if you select yesterdays date as the “From” and today’s date from the “To”.
Move a Discharged Patient Back to the Tracking Board or Schedule
If a patient has accidentally been discharged, users can select that patient and bring them back into the appropriate room in the Tracking Board, or into the Schedule.
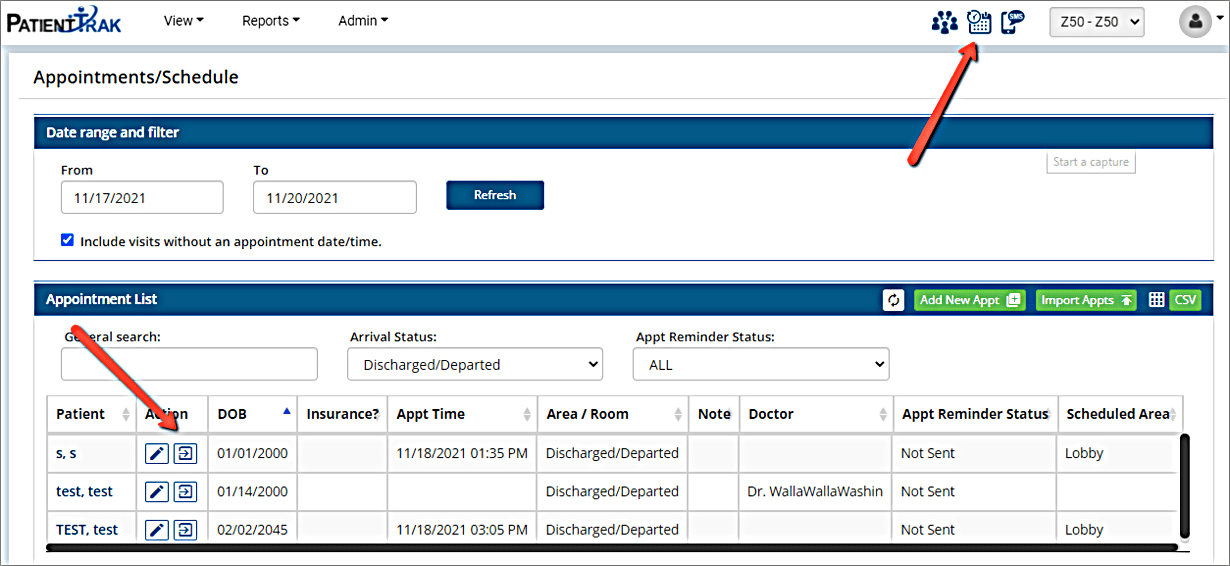
-Select the Appointments/Schedule Icon.
-Find the patient, and select the Edit This Patient Icon.
-Choose which area to move the discharged patient into.
Patient Search
If you need to locate a past patient there is a Search function available under View> Patient Search.
You can filter by the following: First Name, Last Name, First & Last Name, Service Type, Misc Field 1, Note. A table will be provided for you providing you with data from the value you entered. The table is sortable by column and can be further searched using a search field. This table can be exported out to a CSV file if required.
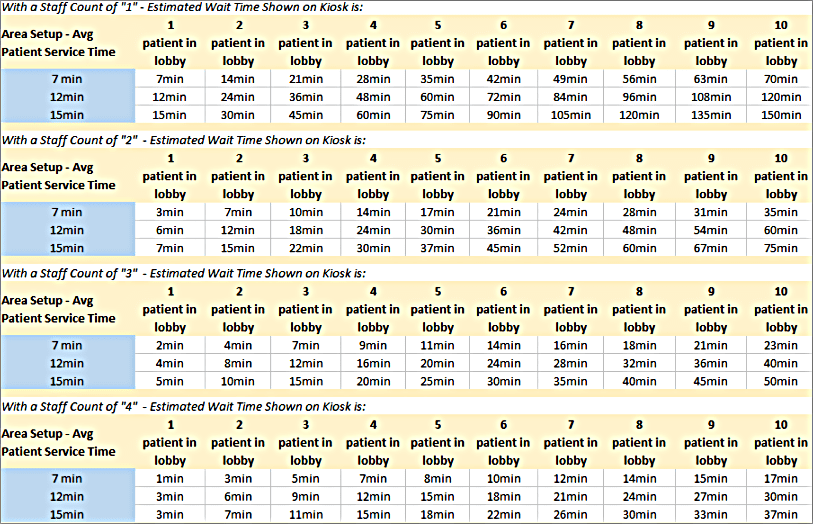
Today’s Staff Count
This menu allows the User to set the amount of resources that will be used in areas set up as Urgent Care. The number that is inputted for an urgent care area is factored in as part of a calculation so that “Estimated Wait Times” can be shown on a Kiosk “Welcome and/or Thank You” screens.
To use this feature you will need to set up an area(s) as an Urgent Care and provide a value (minutes) for the “Average Patient Service Time” field. Please see Admin>Areas section of this document for more details.
Text Messaging Center
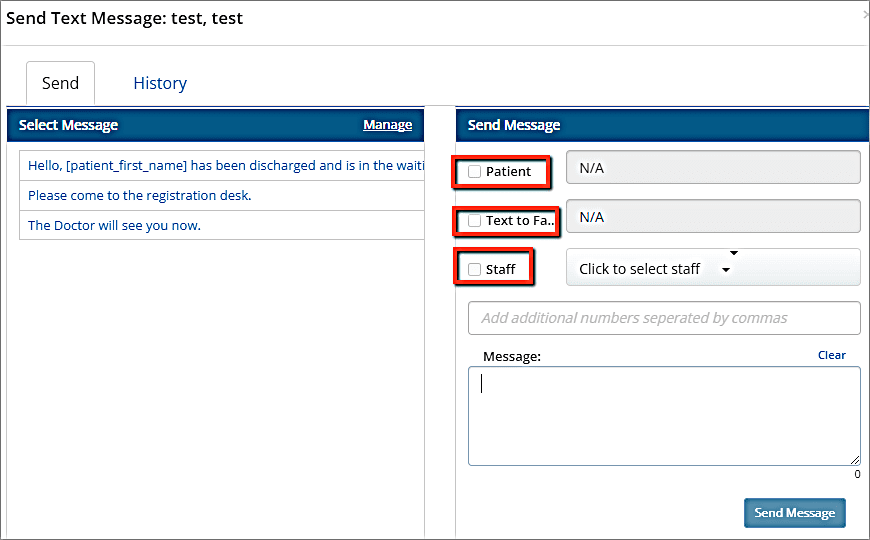
PatientTrak’s Text Messaging Center allows you to easily send text message notifications directly to any cell phone or provided pager, from your existing desktop computer. All patient visits and staff members are listed on the screen, allowing any associated text message to be sent to family, visitors, patients, or staff. Patients and family members are no longer tied to specific areas of the facility, waiting for their name to be called. Staff members may be instantly notified with important details when their services are requested. These are just a few examples of how PatientTrak’s Text Message Center can improve patient care at your facility. Our new text messaging center has a very intuitive patient list. The columns are sortable, patients can be edited or added directly from this record list.
• The text messaging center offers the ability to add staff members to patient messages or send messages specifically to staff members. This offer great flexibility for the user managing the system.
• When the patients and or staff phone #’s are selected they populate the “Send a text to:” dialog box. This allows the user to quickly assemble a message for sending.
• The “One-Click Messages” list can be constructed to use a canned response.
• For ease of tracking, a list of all past text messages has been logged. The “time” column can be sorted to see the latest sent texts and by what user and for what patient.
• If you need to locate a text from a specific day and time, a history tool has been made available for a more pin-pointed search.
Click here to send only to Family or Friends and not the Patient Family and Friends Text-Messaging
From the Text-Messaging Center you can review the history of the texts that have been sent. In this capture we see that an error has occurred when attempting to send. History is accumulated after each text sent and can immediately be seen in the history list.
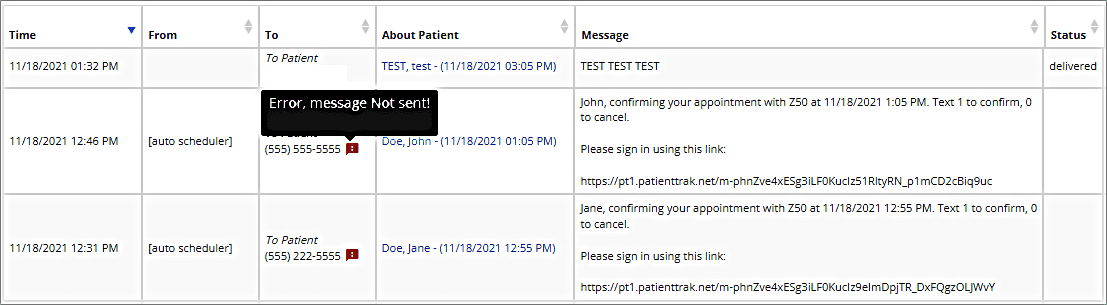
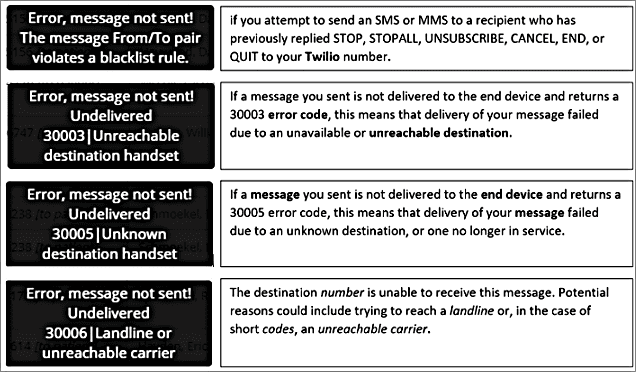
Below is a list of the most common errors that can occur when trying to send a text to a patient.
Text Messaging from The Tracking Board
Users may now use PatientTrak’s Text Messaging System directly from the Tracking Board. In the Action column, there is a text message icon that allows the use of PatientTrak’s text messaging system.

Message Family and Staff along with the patient
Users can also message Family and Staff members within the Text Icon.
The “Family” or secondary number field label can be changed in the Organization Settings page in the “Text to #2” field.
-Under the Admin dropdown menu, select Organization Settings.
-In the Patient Related Fields column, scroll down to “Text to #2” field.
-Enter in the desired label, such as “Family Number”, and click on Save.

Alternate Texting
A user may select alternate numbers to text when using Area and Activity Texting.
Discharge Texting
Users can setup a discharge text to be sent once a patient has been discharged from an area. This can be used to text patients, family or even Doctors and Nurses.
Under the Admin dropdown menu, select Organization Settings.
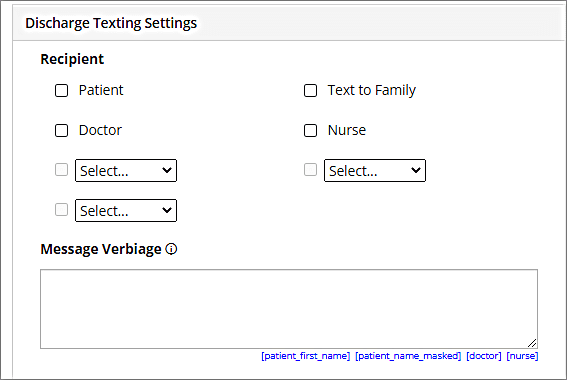
-Scroll down to Discharge Texting Settings.
-Select who will receive the text.
-Enter in the desired verbiage, and click on SAVE.
-Now when a patient is discharge, this text message will be sent.
Broadcast Texting
Broadcast Texting is an optional feature where users may text multiple numbers at once.
To use Broadcast Texting, go to the Text Messaging Center and click on the Broadcast tab.
Click on the Import List button. Choose the desired file and insert a description for the Broadcast Message. NOTE: The .CSV requirements for the file.”

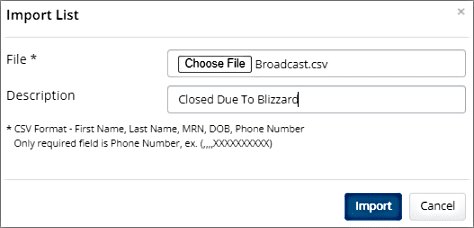
To send a Broadcast Text, click on SEND NEW TEXT. Enter in the message and click SEND.
Scheduled Texting Campaigns
The Scheduled Texting Campaigns module utilizes cloud-based automation to schedule and send text-messaging appointment reminders to any mobile phone. An unlimited number of messaging campaigns can be created to send messages to specific patient groups on a limited basis or automatically on a schedule. These campaigns can be defined by doctor and service codes to create tailored text-messaging.
This module works in concert with PatientTrak’s patient appointments /scheduling feature and can be further integrated with PatientTrak patient tracking and text-messaging center.
• You can locate the campaigns through the Admin > Scheduled Texting Campaigns. This menu provides you with the ability to name and create the campaign message.
• Message Templates can also use formats [doctor] [service] [appt_date] [appt_time]. When these formats are used, the data is extracted from the appointments/Schedule and inputted into the text message that is sent. In this example; “You have a 10:30am with Dr. Jones for Exam on this Aug 27th. If you need to reschedule please call 1-888-777-6666”
• The Reminder for Doctor drop-down provides all the doctor names from the staff list. Select one if it relates to only that doctor, or “ALL” if you need all doctors to be updated with that campaign.
• The Reminder for Service drop-down allows you to further define just one Service or Type Codes. These codes are managed through PatientTrak’s Admin/Type Codes menu. Select “ALL” if campaign message does not need to be specific.
• By default, when you create a campaign it is “active”. Most campaigns will be automatic and will run consistently based on your scheduling. When you have finished, click “Update Campaign” to save.
• If campaigns have been set to “Inactive” you will be able to easily see the status from the list.
If you wish to consolidate a patient’s appointments for one day or a families appointments, select singled message can be sent by checking the box available under the Reminder Basis of “At a specific Time of day” as shown below. When programming, put brackets { } on each side of the text you “do not” want to repeat in the text.
NOTE: The phone # will have to match for each appointment for that patient or a families appointments. In the example on the right, the message was not put in brackets [ } so it was duplicated for each family person in the text.
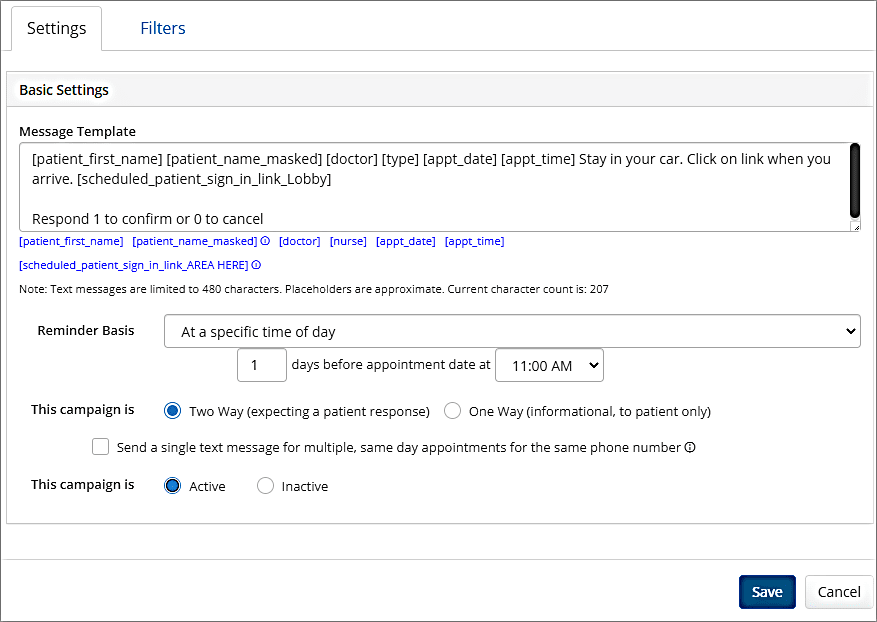
There are one and two-way texting (expecting a Patient Response) campaign types. If you select one-way, the information will only go to the Patient. Nothing is expected back. If you select the campaign to be a two-way, the Patient can respond.
Responses can be:
1 to Accept the Appointment
0 to Cancel/Reschedule the Appointment
Or,
START, YES and UNSTOP – Any of these replies will opt customers back in to the messages
STOP, STOPALL, UNSUBSCRIBE, CANCEL, END, 2 or QUIT – Any of these STOP keyword replies will prevent a customer from receiving new messages
Default reply: You have successfully been unsubscribed. You will not receive any more messages from this number. Reply START to resubscribe.
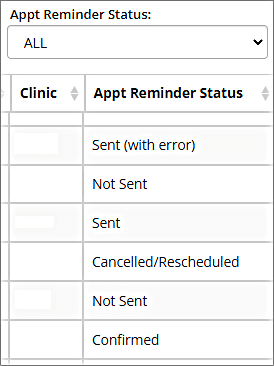
You can see the status of a Patient and whether or not the reminder was not sent, sent, confirmed or cancelled/rescheduled/Stopped in the Scheduling/Appointment page.
Filter Scheduled Texting Campaigns
A user can filter the Appointment Reminder Campaigns to be sent based on certain criteria.
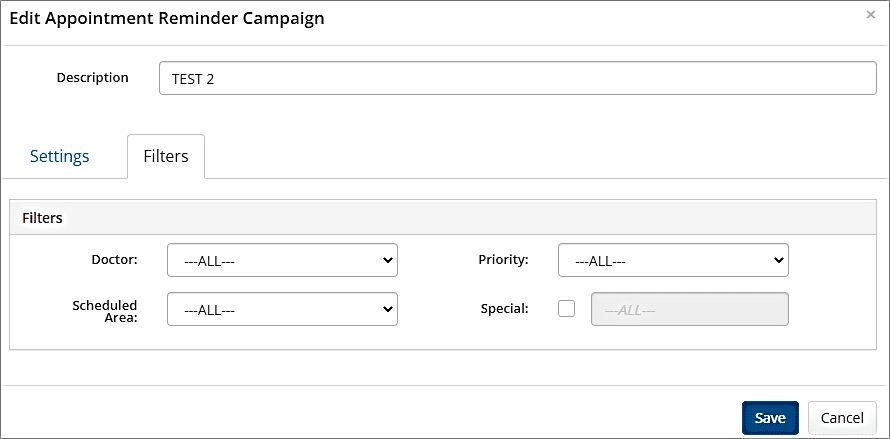
Select the Filters tab when opening the Edit Appointment Reminder Campaign option.
Follow Up Scheduled Texting Campaigns
Users can now setup Scheduled Texting Campaigns to be send to a patient after their visit or if a patient missed their appointment.
-Select “Scheduled Texting Campaign” option in the Admin dropdown menu.
-Click on the “Follow Ups” tab on the Schedule Texting Campaigns page, and then click on the green “Add” button.

-Enter in the desired parameters.
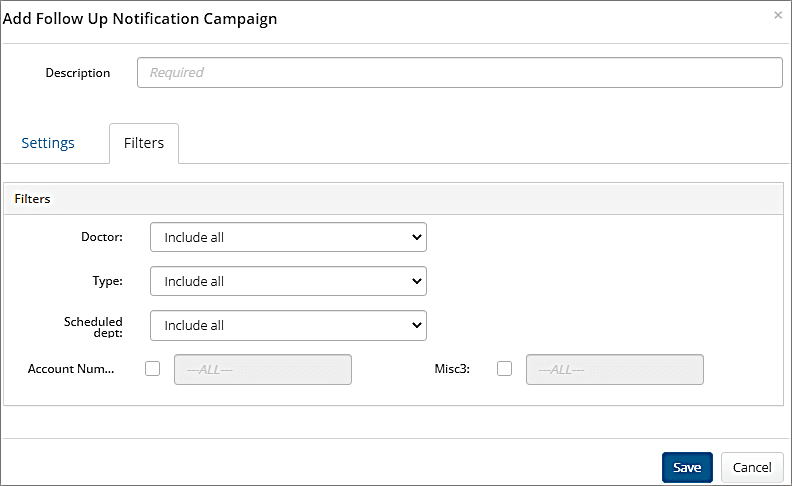
-Users may also filter out the campaigns to be sent only to specific patients. Just select the “Filters” tab and select the desired parameters.
NOTE: All Scheduled Texting Campaigns are set to “INACTIVE” by default.
PatientTrak Forms Campaigns
Users can now setup Scheduled PatientTrak Texting Campaigns to be sent to a patient prior to their visit.
-Select “Scheduled Texting Campaign” option in the Admin dropdown menu.
-Click on the “Forms Packet” tab on the Schedule Texting Campaigns page, and then click on the green “Add” button.

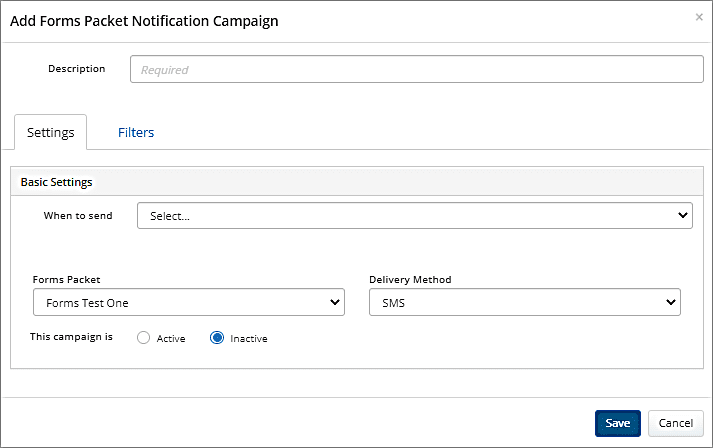
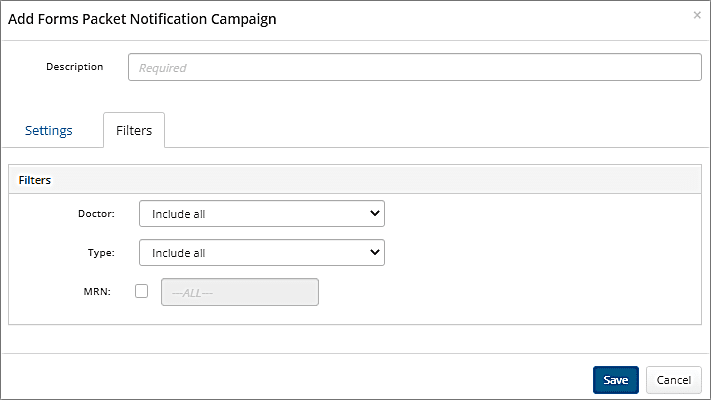
NOTES:
-All Scheduled Texting Campaigns are set to “INACTIVE” by default.
-To use PatientTrak Forms, please contact your PatientTrak Account Manager.
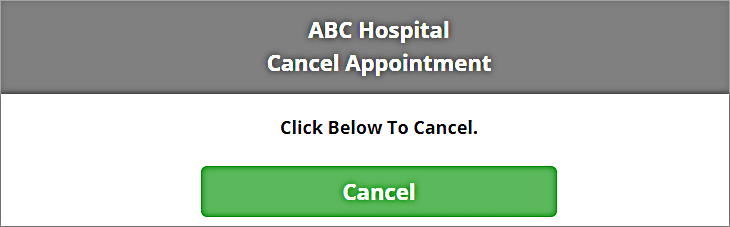
Cancel Appointments via Mobile Link
For those PatientTrak clients who are using the Online Reservation feature, Patients can now cancel their online scheduled appointments via a mobile link.
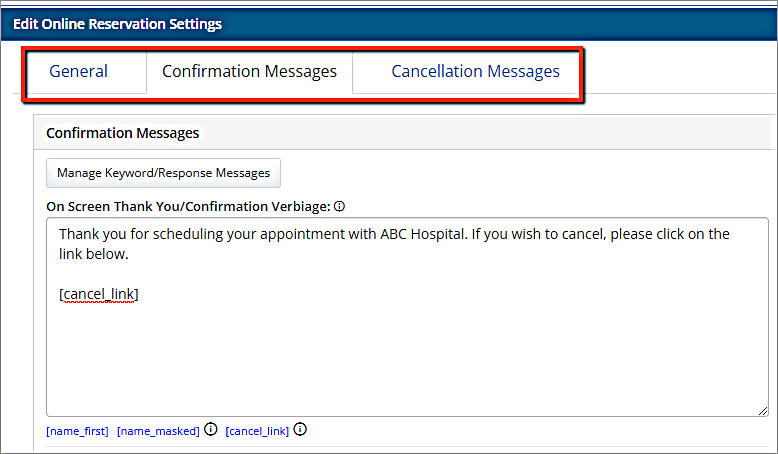
-To set this up, go to the Admin drop down menu and select Online Reservation Settings.
-Click on either the Confirmation Messages or Cancellation Messages tab.
-Type in the desired verbiage, insert the “Cancel Link” place holder, and click on Save.
Reporting
PatientTrak offers several Reports accessible on the top menu bar, they can be exported to CSV or PDF formats if needed.
Below is a list of the reports and a description of what each report produces.
Peak Time – A count of patient arrivals by hour of day.
Patient Counts – A count of patient visits
Time Between Activities – Average time it takes between any two selected activities
Time Between Activities By Assigned Doctor/Nurse – Average time it takes between any two selected activities, broken down by Doctor or Nurse
Activity Counts – Provides a count of how many patient visit records were stamped with a specific activity
Average Time in Area – The average amount of time patients are spending in any given area.
Room Usage – Breakdown of hours/minutes each room is used. A utilization percentage based on Room availability, patient count and average time spent in each room.
Percent of Patients Within Selected Timeframe – Presents the count and percentage of patients which meet a specified goal.
Patient Volumes By Hour, By Day of Week – Patient volumes by the hour for a given day of the week.
Patient Time in Area Detail – A detailed list of all patients who spent more than the entered number of minutes in the selected area.
Average Time in Room – Provides a listing for each room and how many minutes, on average, patients are spending in each room.
Average Visit Duration – Provides a count of patients broken down by total visit duration in minutes.
Maximum Facility Time – Presents the patient’s name, service date and visit time of the longest visit for each day in the specified date range.
Maximum Wait Time – Presents the patient’s name, service date and the number of minutes of the longest amount of service time between any two selected service ques or areas for each day in the selected date range.
Average Time In Area And Contact Count By Staff – The average time a patient spends in an area with a given staff person, in addition to the count of contact episodes by staff person. NOTE: This report considers the Staff ID of the logged in user who performed the activity of adding or moving a patient into the selected area.
Mobile Sign-In Usage – Presents a list of patients who used the Online Registration. NOTE: Online registration must be active in order to see this report.
NOTE: All report data is available going back 15 months from today.
Trend Reports
PatientTrak offers Trend Reports, which present monthly, weekly, and daily trends for many different data points which are captured in the application. Trend reports include:
Average Time in Area
Patient Count by Alert
Patient Count by Type
Patient Count Totals
Average Visit Duration
Percent of Patients Within Timeframe
Time Between Activities
To use this new feature, select Trend from the Reports dropdown menu.
Report – Choose the desired report
Timeframe – Select the date range for which the data will be selected for the report
Period – Select how the chart will be broken down, either Daily, Weekly or Monthly.
Other Parameters: Depending on the report selected, additional values may be required, such as Areas, Minutes, and Activities.
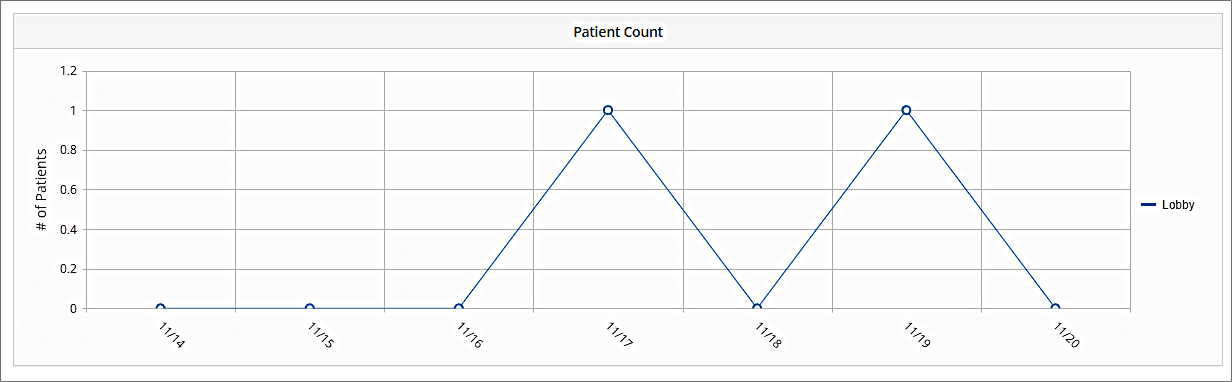
Below is an example of a Patient Count, Trend report.
Saved Report Definitions
Report definitions can now be saved and can be generated at any time from a list. Each report definition can be saved and labeled as needed.
To see the list of Report Definitions, navigate to: Reports > Report Definitions
From this list you can elect to generate the report where a new page will launch and the report details will be shown. You can select Edit, which will allow you to make a change to any of the parameters earlier set.
Note: Report definition cannot be labeled the same, each one will need to be a unique description.
Export Data Report
PatientTrak System Administrators can have the Export Data scheduled to be emailed.
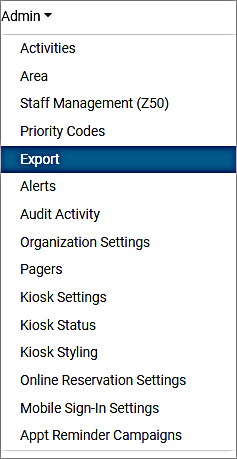
Under the Admin dropdown menu, select Export.
A user can either generate the report on demand, or select the report to be emailed daily, weekly or monthly.
To have the report emailed:
-Choose the desired Export parameters.
-Select Save & Schedule.
-Enter in the Report Description, when you would like the report emailed, and the desired email address.

-Enter in the Report Definition Description.
-Select desired Delivery Frequency.
-Enter in the email address and click on Save.

Area and Room Set Up
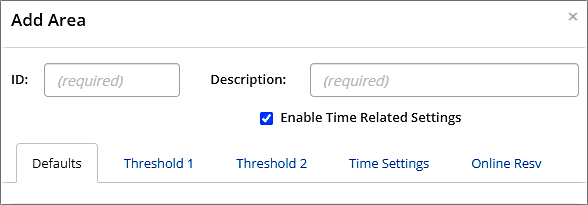
Adding and Editing Areas
An Area is considered a physical space that a patient can be moved or arrived into. Patients can be moved from area to area using the Tracking Board. An area could be labeled anything. Here is a partial list of examples; Lobby, Waiting Room, X-ray, Pediatrics, Echo Exam Room, Front Desk Main, PT (Physical Therapy), Registration, MRI Booth.
An Area has an Area ID and Area Description for help in locating it on the Tracking Board. There are configurable Settings for when a Patient is “Added” or “Patient Moved Activity” has changed. Color coding is available as well as a “Blink” notification after a selected number of minutes. As an example: A patient is added to the Lobby but they haven’t moved before the set notification of 10 minutes, therefore the a color change occurs and blinks so the User knows someone has been there too long without being recognized.
If you have numerous Areas to configure for your system, we suggest you create a list and labeling scheme that makes sense prior to programming. From that list, you may also want to add Rooms under any specific Area. See below *Rooms” for more details.
An area can also be set up as a “Urgent Care” area. Defining an Area as Urgent Care provides more functionality. When you check the box “Enable Time Related Settings”, your menu will expand and allow you to define an expected service time in minutes. This service time is calculated against the number of resources you provided in the “Today’s Staff Count” menu which in turn provides an “Estimated Wait Time” on the Kiosk. Also, you can select when the Urgent Care area is open daily across the span of the week.
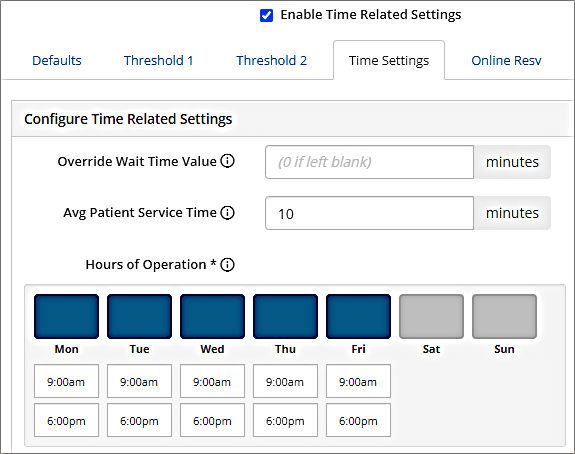
• The days of the week configuration relates directly to the use of the Kiosk. When the “Auto-Close” and a “End of Day” Kiosk placard/message is configured, the Kiosk will show the “End of Day” message automatically when the Urgent Care closes. Likewise, the regular patient sign-on will automatically show upon the start of day that is programmed. See Kiosk Status in this document for more details.
• Remember to update the “Today’s Staff Count” for each area you set up as Urgent Care so that the estimated wait times are accurate.
Note: Not all Areas using Urgent Care are actually Urgent Care, however to make use of the Kiosk “Estimated Wait Times” and Auto-Close Kiosk functions, you will need to set your Area up as such.
Rooms
Rooms can be considered as physical locations nested within an Area. You can add as many Rooms as you need to an Area. We suggest you label them with short names as they will be easily identifiable on the Tracking Board. Example: Area = MRI and MRI Rooms = MRI Rm1, MRI Rm2, MRI Rm3.
• When Rooms are used on the Tracking Board they are shown in a separate column. If you click on a Room name in that column, a “Room Settings” menu appears. Please go to Tracking Board Use/Setting Alerts for Rooms within this document for more details.
Note: Patients are arrived into Areas, not Rooms. This is especially important when patients are arriving using the Kiosk. Do not add rooms to an Area that Patients will arrive into from the Kiosk. Example: Lobby
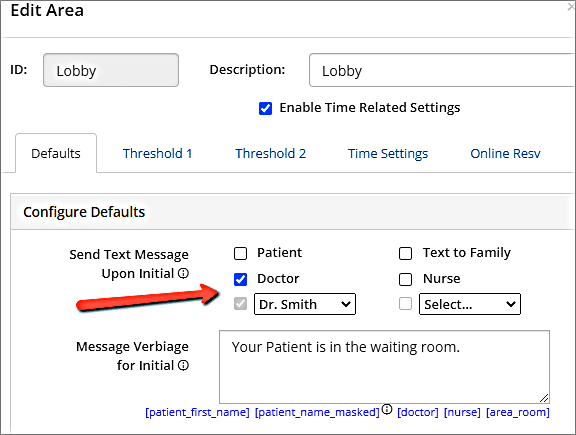
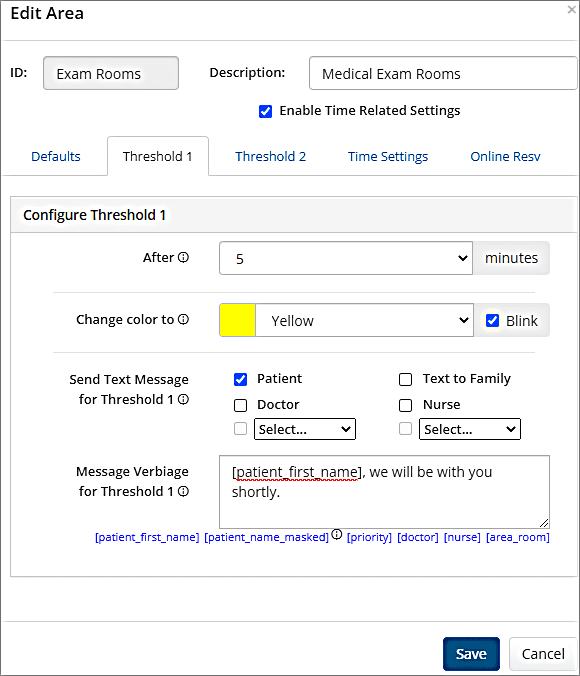
Area Auto-texting Configuration
You can assign an automated Text Message to be sent upon a change to an Area/Room as well as when set Thresholds have been satisfied. Navigation: Admin > Areas >Click on Edit of the desired area – The “Defaults” tab refers to when a Patient is “moved” into that Area. The texting messaging module is required to take advantage of this feature.
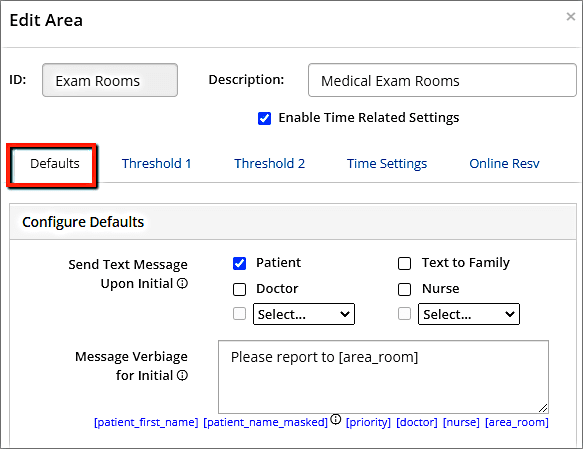
Information regarding the Patient, Doctor, Nurse, Type Code or Area/Room can also be extracted and dynamically put into the message at the time of sending by selecting the “placeholders” in the brackets.
[patient_name_masked] [patient_first_name] [area_room][nurse][doctor][type]
In the example below, Threshold 1 was set for 5min with a color change of blinking yellow. The text message will be sent to the Patient while they’re in the Lobby. Their first name will be in the message as well. Threshold 2 can also be set to another value with yet another text message.
Staff Management
Adding a New User – Admin Only
To add a new staff member, or to add an existing staff member to an Enterprise Organization, please click on the Adding Users Guide below.
Editing A User – Admin Only
You can edit a user’s permissions by selecting the “Edit” button for a user in the Staff Management page.
NOTE: Email addresses CANNOT be edited. If a user enters in the wrong email address or their email address has changed, you need to delete that user and then re-add them as a new entry.
Manage Activities
Patient visits involve different events that may be recorded in the patient tracking system, such as “Patient Moved” or “Ready for Doctor”, for example. The time of each Activity is also recorded and used for analysis and reporting. When a patient is moved it is considered a system activity. Custom Activities may be defined, but are not required. Custom Activities are performed on a Patient and events that take place during a Patient visit, as “Patient In Treatment”, “Blood Screening”, or “with RN” as examples. Activities are recorded and time-stamped and can be analyzed for service improvement purposes through reporting. To define Activities within the system, select the menu option Admin > Activities.
• Enter an Activity Name. This will later be a choice for selection when picking Activities to add to a Patient record.
• Select the color that you would like the Activity to appear when displayed on the Tracking Board .
• Select to change the color after a number of minutes and set it to blink if you wish to set up a notification on that Activity.
• Notifications on the Activity can be set from 1 to 500 minutes.
• An audio alert can also be set on the Activity from 0 to 120 Minutes.

Auto-Text On Activity
You can assign an automated Text Message to be sent upon a change to an Activity as well as when set Thresholds have been satisfied. The texting messaging module is required to take advantage of this feature.
Navigation: Admin > Activities – The “Defaults” tab refers to when a Patient is “moved” into that Area. The menu allows for the addition of a text message that will be sent automatically upon the selection of the “Patient in Room” Activity. In this example, the Doctor will receive a text that a patient is not in an specified area.
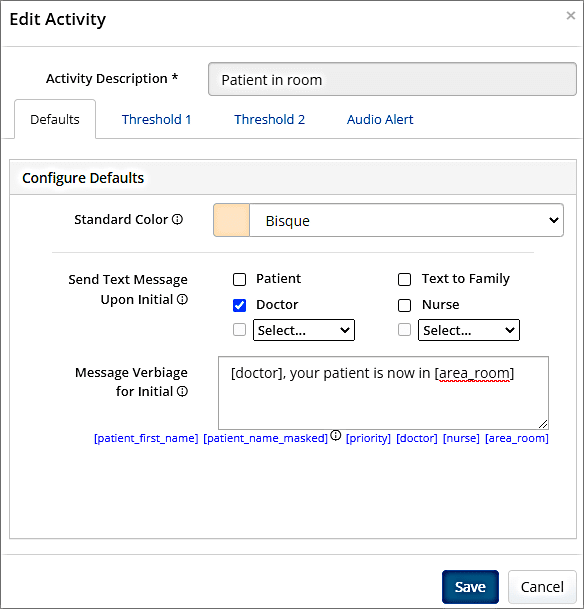
The “Threshold 1 and Threshold 2” tabs allow for the addition of a text message to be sent out automatically when the Threshold is met.
Link Activities and Areas/Locations
Users can link specific activities to selected areas. This feature will show only the selected activities to show on the dropdown menu for the linked area.
NOTE: All activities will be linked to all areas unless edited by the system administrator.
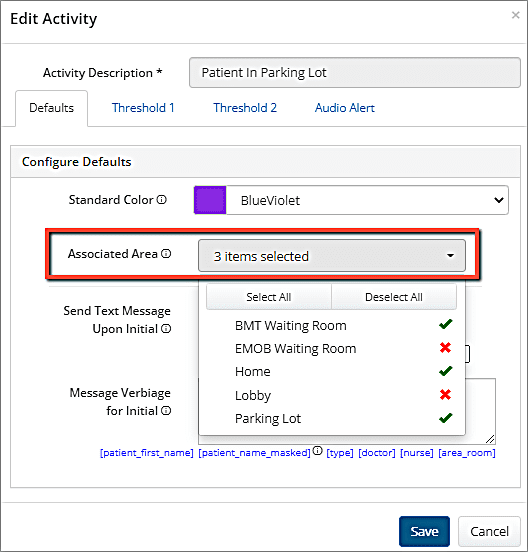
• In the Manage Activities Page, click on the Edit button of the desired activity.
• Click on the Associated Area/Location dropdown.
• The dropdown will show a list of all areas/locations within your system.
• To select a specific area/location for the activity, click on the area to make a green check mark appear.
• To deselect an area from the activity, click on the area to make a red “X” appear. Click on Save.
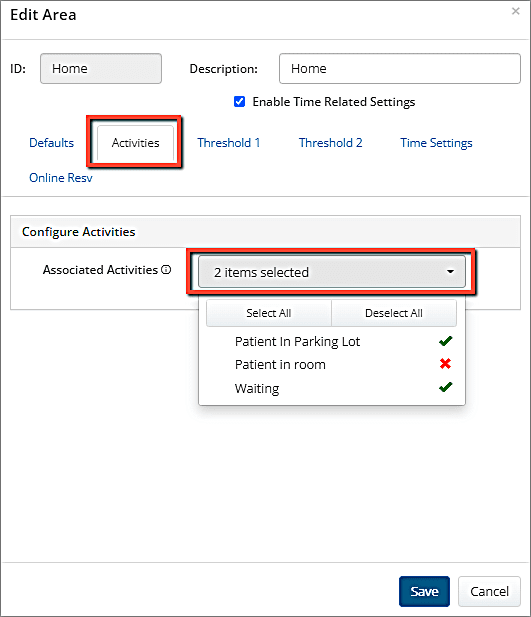
Link Areas/Locations to Activities
• In the Manage Areas Page, click on the Edit button of the desired area.
• Select the Activities Tab.
• Click on the Associated Activities dropdown menu.
• The dropdown will show a list of all areas/locations within your system.
• To select specific activities for the area/location, click on the desired activity to make a green check mark appear.
• To deselect an activity from the area/location, click on the area to make a red “X” appear. Click on Save.
Type Codes
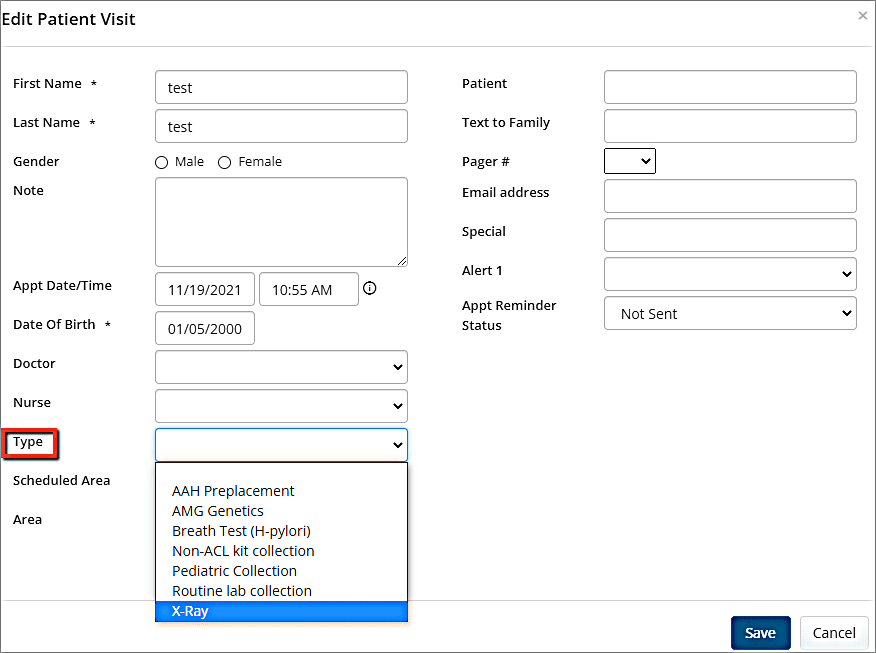
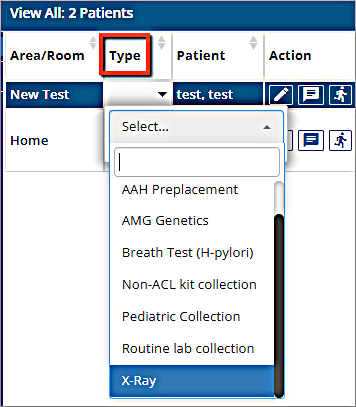
Type Codes are also known as Priority Levels, Reason Codes or Service Codes. These codes are usually used to signify the status of the patient. Type Codes can be assigned to existing patient records or to new patient records as they arrive.
When you add a Type Code you you can name it accordingly as well as select a color that will stand out on the tracking board when selected.
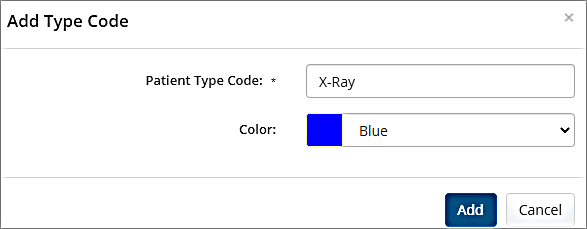
When the Type Code is enabled under Organizational Settings, it becomes available in the patient record. These Type Codes can also be seen on the Tracking Board if enabled within Organizational Settings.
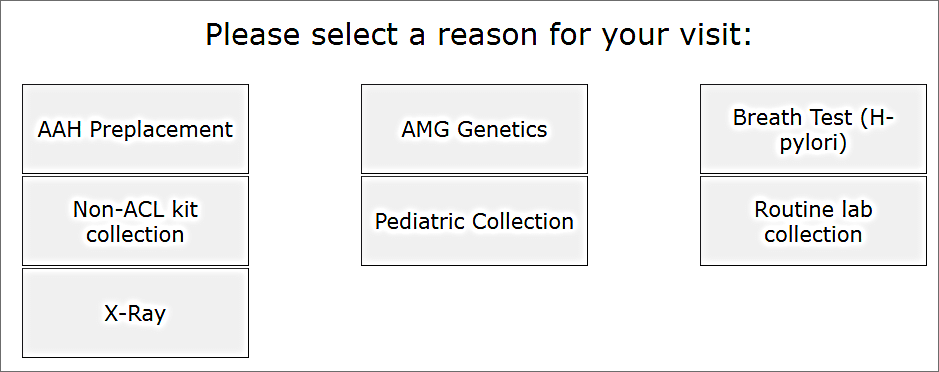
Note: Type Codes can also be used during the patient sign-in process on the Kiosk. The patient can select from a list (ex. Chest Pain) as part of a question “Why are you Here? or Reason for Visit?” and that information will be brought into the patient’s record and the Tracking Board if required.
TIP: The Type Codes label can be renamed to meet your needs, this is done by going to Admin>Organizational Settings to rename it.
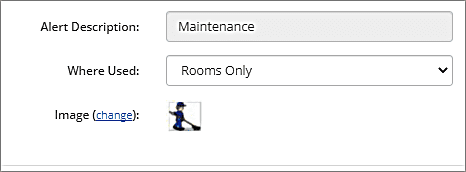
Alerts
An Alert is used to communicate patient needs or special designations between staff members using the Tracking Board. Alerts can further describe a patient’s status in a graphical way. Alerts can also be applied to Rooms such as with maintenance needs. Two different selections are available when selecting Alert Icons, “Modern” or “Classic”. Keep these things in mind while configuring your Alerts. If you do not see an Icon to best fit your needs, please call PatientTrak Support for help.
In this example, the Alert is specific to “Patient’s Only”.

Note: In order to utilize the Alerts on the Tracking Board you need to enable them within Organizational Settings. Please see below Organizational Settings/Tracking Board & System Settings section to enable.
Organizational Settings
Organizational Settings can only be accessed by Administrators (See Staff Section). These settings help you set up patient record related fields, tracking board configuration and use, along with the public screen if you’re using it. The configuration consists of labeling, enabling and disabling fields and features. Saving after changes are made will update the system real-time.
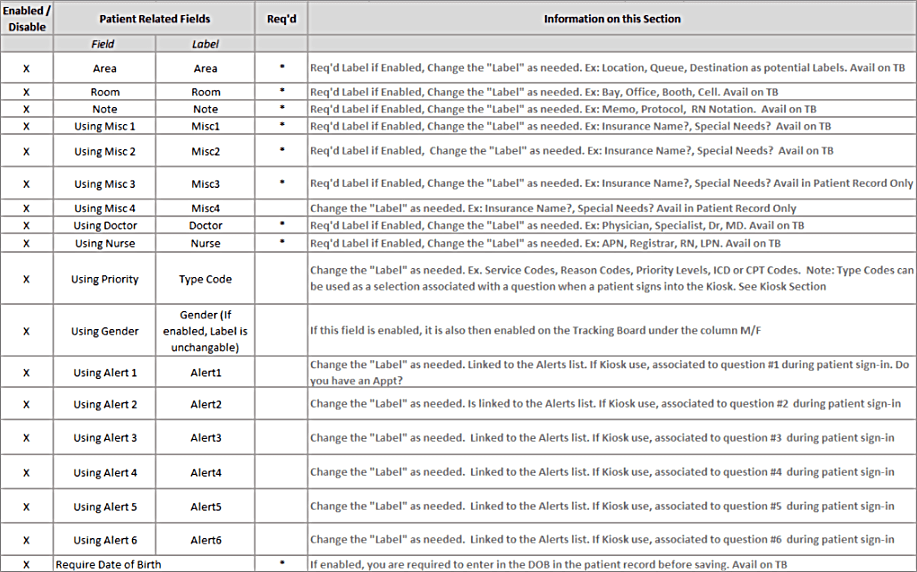
Patient Related Fields
Use this section to change labels on fields, enable extra fields you may need to build a patient record. You can also enable drop-downs so you can select doctors or nurses or types of alerts that you have created.
• IMPORTANT – Fields with an “*” asterisk are required before you can save changes.
• Also, without a label you will not see that Patient “Field” on the Tracking Board.
• Please note that the Alerts can also coincide to Kiosk questions. If you enable question #1 on the Kiosk (ex. Do you have an Appointment?) and also enable Alert #1, you can have a YES/NO question on the Kiosk come through into the Patient record and also to the Tracking Board if you want. Please contact Support for more help in configuring and also review the Kiosk Settings section in this guide.
Note: These Fields are shown as Enabled “X” as an example. Most systems have a variety enabled to meet their specific needs.
Tracking Board and System Settings
Tracking Board settings are optional. Many of these settings are only available if already enabled in the Patient record as described above in the Patient Related Fields section. When setting up your Tracking Board, make a list of what is first required, then add as necessary to provide you with more granular information.
Note: If a field label is changed in the Patient Related Fields, it will show that label in it’s selection below. Ex. You renamed Nurses to RN, you will then see RN as a selection to enable/disable in this section.
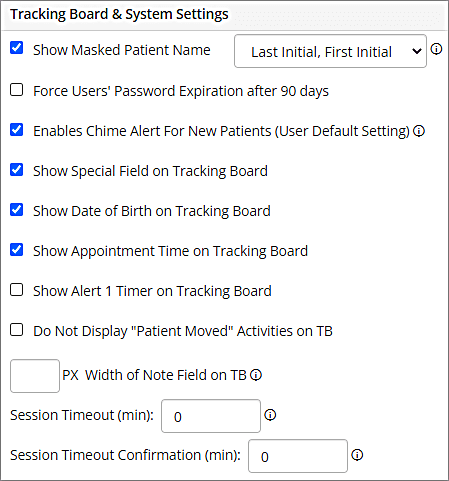
Show Masked Patient Name – This will mask a patient’s name on the Tracking Board when using the publicscreen setting. Force User’s Password Expiration After 90 Days – This will inform the Staff to change their password every 90 days.
Enable Chime when new Patient is displayed – Every time a new patient is added to the Tracking Board, the user will hear a chime.
Show Special Field on the Tracking Board – Shows the information related to a Patient from the Misc 1 patient record field.
Show Date of Birth on Tracking Board – Shows the Patient’s DOB on the Tracking Board
Show Appointment Time on Tracking Board – If Appointments/Schedules are enabled, you can show the Appointment time and Date on the Tracking Board.
Show Alert 1 Timer on the Tracking Board – A timer column is added to the Tracking Board. This timer is associated with the selection of Alert 1.
Do Not Display “Patient Moved” – The Recent Activity column will not show “System Move” activities. All custom configured activities will show. PX Width of Note Field on TB – The pixel width of the Note field
Pager Network IP – If pagers are being used, a static Network IP is required.
Session Timeout – Timeout session of PatientTrak without any mouse activity. Default is 60 minutes.
Session Timeout Confirmation – Amount of time giving PatientTrak users to stay logged in without any activity
Public Screen Settings
The Public Screen is best placed in a waiting room or lobby. It offers a HIPAA (Health Insurance Portability and Accountability Act) compliant alternative to the Tracking Board so that the public can view who is next in line or where a patient is within the queue without using their name but rather initials.
Note: Public Screen settings are activated when logging in with a User ID named “publicscreen”. A “publicscreen” account MUST be in the system with it’s own, unique email address.
Chime Info
• If another Staff User goes into your area before that new Patient is discharged, they will hear the chime as well.
• Likewise, if a new Patient is added to Lobby II as an example but you’re not monitoring (selected that area on the TB), you won’t hear it. If you switch to Lobby II and that patient is still in that area, you will hear the chime as it is a new patient to you.
• If a new Patient Arrives/or You add them into your area you will receive a chime.
Special Feature
Extra Tracking Board Settings:
• Enabled Tome Related Settings for one or more Areas. This setting is related to the Kiosk “Estimated Wait Time” message/status.
• Filter to Display the Doctor Name instead of the User ID. The filter button will show orange when it is set.
• Filter to Display the Nurse Name instead of the User ID.

• Enable Appointment “merge” in “Note” Field. Occurs on manual Patient check-in or via Kiosk. If multiple appointments are scheduled for one patient for the day, they can all be displayed in the “Note” column on the Tracking Board. This can be achieved if the Misc1 field has a unique number such as an MRN#. If the number matches in each appointment then the appointments will be merged so the User can easily see the pending appointments.
• Enabled Patient “Lock” when editing. Pertains to editing an existing Patient or Appointment.
PatientTrak also offers several additional features and functions, these require activation by Support. The list below will provide you with a Module or Service name, if interested please contact Support or Sales for further help.
Tracking Board Set Up
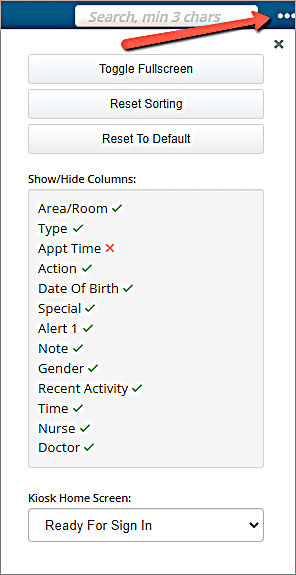
The Tracking Board is set up by enabling/disabling and labeling fields by entering the ellipsis (upper right-hand corner on Tracking Board) then clicking on the “Show/Hide Columns arrow . Every change you make then save, and will show on the Tracking Board immediately. In this example the green check boxes show what is enabled. If an “X” is next to a label means it is not enabled on the Tracking Board.
Sorting
Each Column is sortable. If more than one sort is required, please click on your 1st column header, hold down the “SHIFT-KEY” and click on the 2nd column header. You can then click on the refresh button (upper-left) and your sort will be saved.
Tracking Board Use
Arriving A Patient
Arriving a Patient can be achieved several ways:
• A Patient can be added by a User directly to the Tracking Board by selecting “Add New Patient”. Once saved, this Patient is then added to the Tracking Board under a specified Area/Room.
• Patient’s can also be added via the Kiosk after answering questions and completing the sign-on.
• If PatientTrak is set to accept Appointment information through the customer’s EMR, the User can arrive the Patient through the Appts/Schedule menu. This process is automated and follows a HL7 standard. See Terms for definition and Automated Adding of Appointments for more details .
• Appointments can also be received from an file provided by the customer and imported into PatientTrak Appts/Schedule menu manually. Please see section Adding Appointments via CSV File within this document for more information.
• From the Appts/Schedule menu you can also select a Patient, edit the record and arrive them from an Appointment to an Area.
Moving A Patient
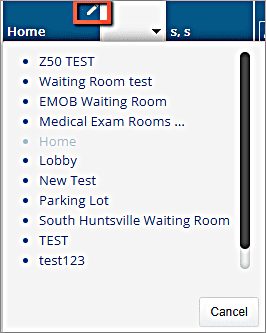
• From the Area / Room column there is an Area or Room associated with each Patient. A link is available for selection that offers a drop-down of all Areas and or Rooms. If an Area has Rooms associated, three dots “…” will show after the Area name. If you click on those dots you will see a list of Rooms that you can further select the Patient to move.
• From the Patient record, you can select from the Area drop-down, upon saving, the Patient is moved on the Tracking Board.

Activity Changes
The Tracking Board displays a column called “Recent Activities”. The most recent Activity that has taken place during the Patient’s visit is displayed in this column. The Activities for a Patient can be System Activities such as a Patient arrival or move into an area or room. Or, an Activity can be selected by the User to indicate the change or status. The Recent Activities drop-down menu will show all the custom Activities that were created and made available on the Tracking Board.
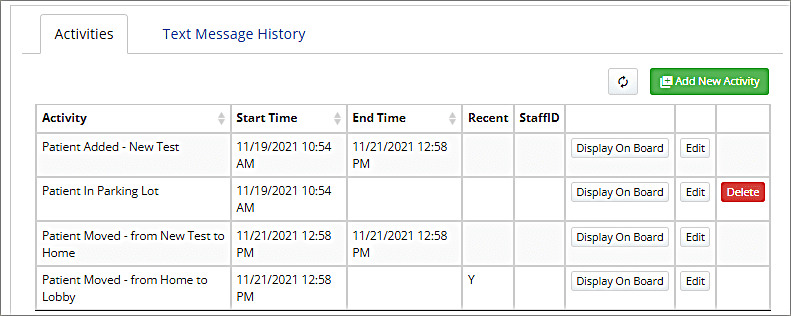
If you need to see all of the Patient’s Activities listed from the time of their arrival, you can edit the Patient’s detail view directly from the Tracking Board for a list. In this capture below we see the start of the Patient’s Activities when they were added to the “New Test”. A time-stamp shows when the Activities were performed (started/stopped). The StaffID also shows us “who” selected the Activity from the Recent Activity drop-down on the Tracking Board. A user may also add a new activity to a patient, if they have the appropriate permissions. The “Delete” button will only be available if you are an Administrator.
Note: All this information is available within the PatientTrak reports.
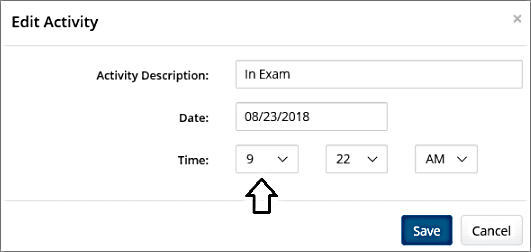
The “Edit” button next to the Activities will allow the User to change the Date & Time information. In the example below, the Patient is being changed to “9:22 AM” instead of “8:38 AM”. These types of edits are not common but for accuracy a User may need to change this information if they find it is not accurate. Likewise, if an Activity was added in error it may be necessary to “Delete” it from the list. See the Manage Staff section for permission to perform these edits.
Setting Alerts for Patients
SETTING ALERTS FOR ROOMS
Alerts can be set from the Tracking Board and associated with a “Room”. An alert can then easily be seen by the User alerting them of status of the room. As an example, you can select an alert that shows the room needs “Maintenance”. This information let’s the User know they cannot put a patient in that room until the status is rectified.
Side-bar
The Side-bar can be hidden by clicking on the carat. This will be saved until clicked to unhide.
Kiosk
Kiosk Settings
PatientTrak offers a touch screen sign in kiosk system, easily implemented on any touch screen monitor. The system is web-based, has a Spanish language option and only requires an Internet connection. PatientTraks’ Sign-In System allows a patient to type their name using a touch screen monitor. This simple to use sign in procedure is helpful in any setting in which patients need to be placed into a queue upon arrival. Once patients have signed in using the touch screen kiosk or monitor, their name is placed into a queue, optionally alerting the healthcare staff with a friendly audio chime on their computer.
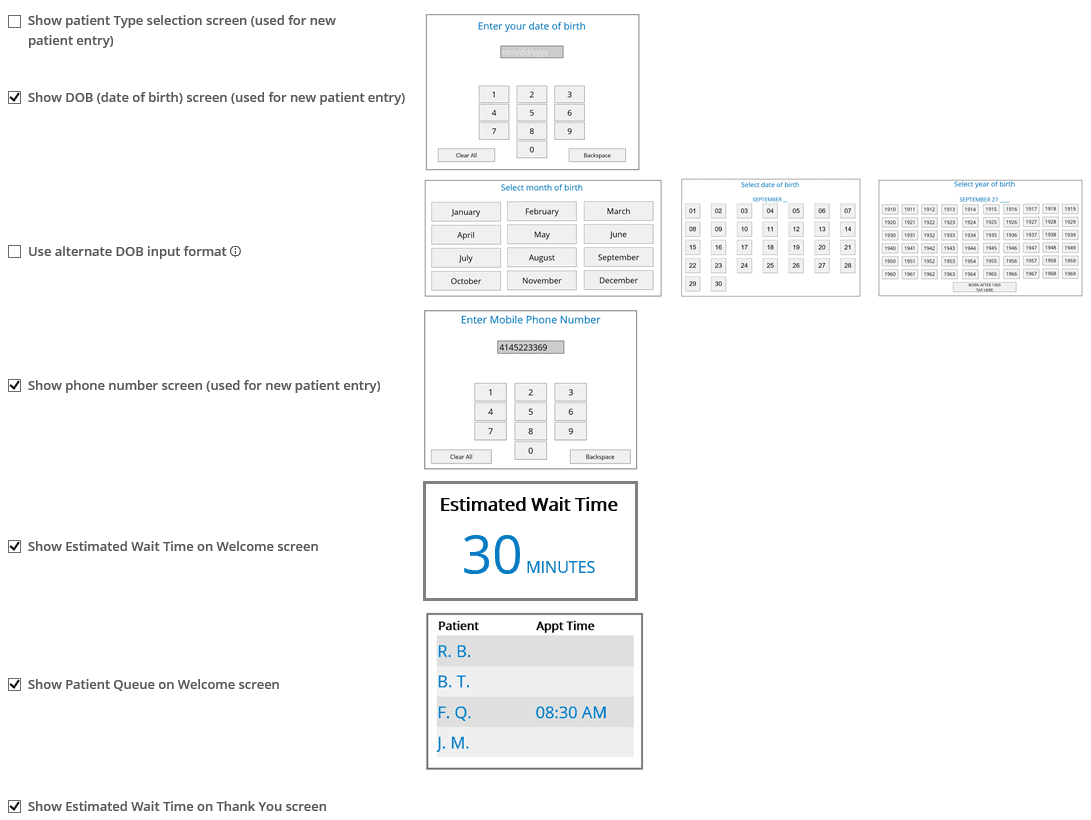
• The Kiosk settings web page allows you to configure up to 6 questions. These questions can be set to YES/NO answers or free-text.
• Question #1 can be turned on and is a system-based question regarding scheduled appointments. When this is enabled at the Kiosk, the patient will answer Yes or No to whether they have an appointment. If an appointment exists, that person can be located and are then arrived into the tracking board. This is done by the patient typing in the first few characters of their first and last name along with DOB. Once this is done the Patient is arrived onto the tracking board.
• Questions #2, 5 & 6 are YES/NO or Agree/Disagree questions.
• Questions #3 & 4 are YES’/NO or Agree/Disagree questions or Free text.
• A checklist is also available to enable or disable some features shown to the Patient during sign-in.
Note: The “Show patient Type selection screen (used for patient entry) requires some set up. Please call PatientTrak Support @ (414) 455-6619.
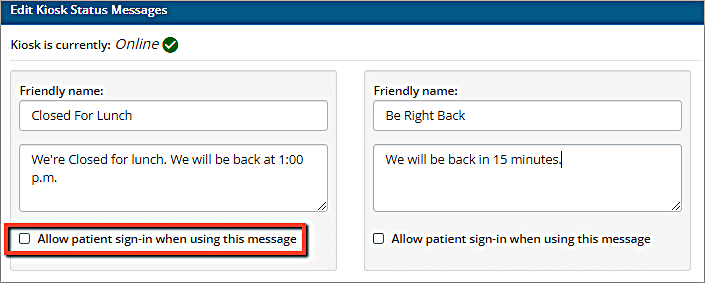
Status
A Kiosk Status menu allows for six Kiosk messages that can be displayed. These are often used to let the Patients know that they are at lunch or are closed for the day. They can be set up to allow or disallow a patient to sign-in depending on the message.
-To setup Kiosk Status, under the Admin dropdown menu, select Kiosk Status.
-Enter in the name of the message in the Friendly Name field, and then enter in what you would like the kiosk to read.
-You can also allow a patient to still sign in when a certain kiosk status is set by selecting the “Allow patient sign-in when using this message”.
To activate a particular kiosk status, select the ellipses on the Tracking Board. In the pop-up menu, select the desired kiosk status in the bottom dropdown menu.
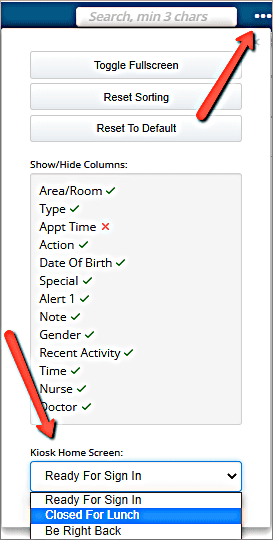
The appropriate kiosk status will then be displayed on the kiosk.

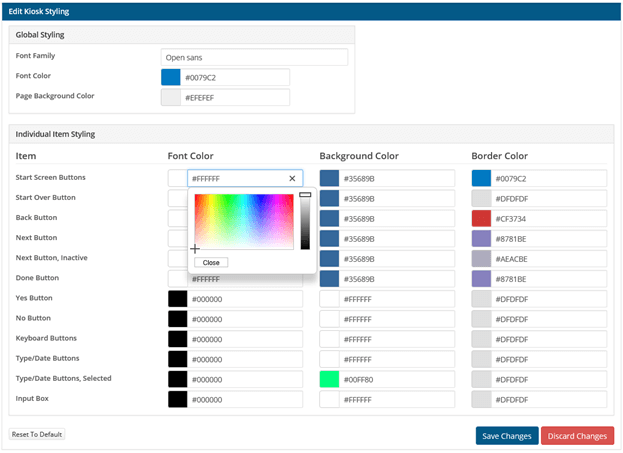
Styling
A Kiosk style menu is available if you want to design the Kiosk web pages. A color chart allows you to change the color of the buttons and background then it shows the name of the HTML color code.
Kiosk Use
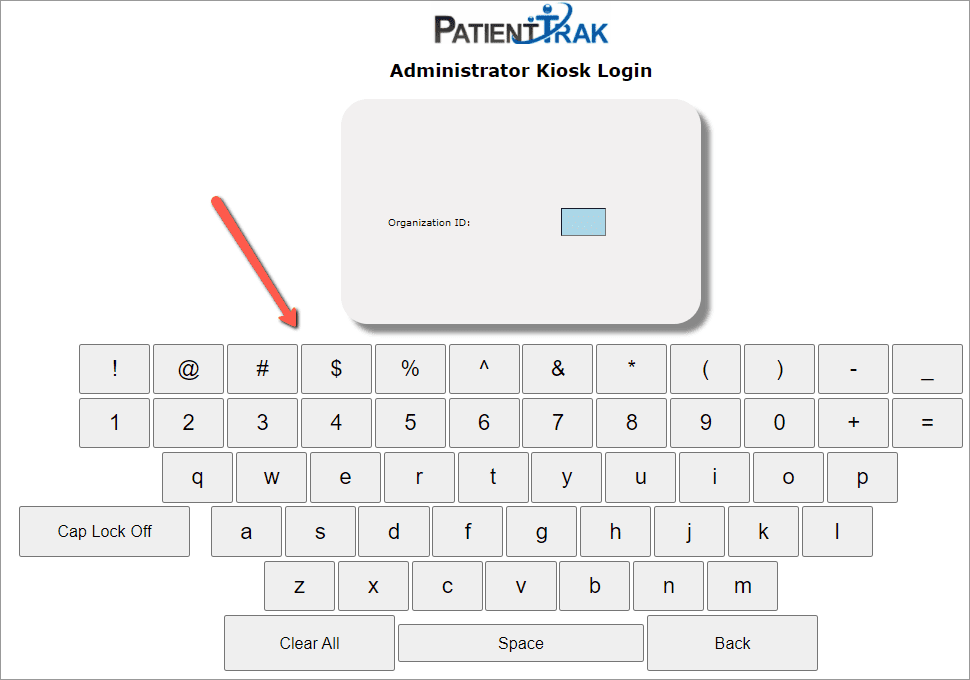
To ready the Kiosk for Patient sign-in, you must first login. Enter in your Organization ID using the keyboard on the monitor, NOT an external keyboard.
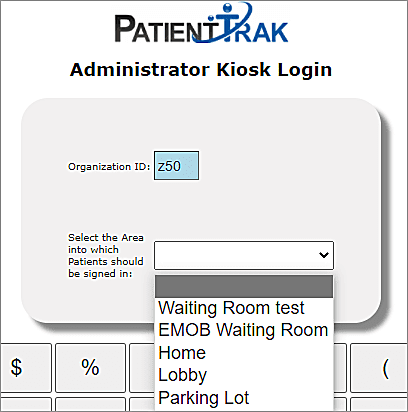
Once you have entered in your Organization ID, select the area to which the patients will be signed into via the dropdown menu and on the Sign In button.
Now the Kiosk is ready for a Patient to “sign-in”. This capture also shows an “Estimated Wait Time” as well as a “Patient Queue” on the Welcome Screen. These are settings that can be turned on if needed. If Spanish is also required as a language, the Patient can click on the button and it will change the questions from English to Spanish.

If you have already configured different “Kiosk Statuses” you will be able to select them from the ellipses on the Tracking Board . In this capture the User selected the “Away for lunch” status. Creating these different Kiosk statuses provides better communication with the Patients who will be using the Kiosk.

Please watch this short video to see the Kiosk in action.
Intake Kiosk
PatientTrak offers a new Intake Kiosk. The Intake Kiosk has the ability to ask a variety of question types such as; Yes/No, Multiple Choice, Phone Number and more. The PatientTrak Intake Kiosk can also be used on any mobile device (see video below). Please see the PatientTrak Intake Kiosk Manual or contact your PatientTrak Account Manager for more details.
Pagers
PatientTrak’s Text Messaging Center allows you to easily send text message notifications directly to any cell phone or provided pager, from your existing desktop computer. All patient visits and staff members are listed on the screen, allowing any associated text message to be sent to family, visitors, patients, or staff.
Click here for more detailed information on setup: PatientTrak and Pagers_Feb2019
• Pagers are added to a list under the Admin drop-down.
• A pager can then be selected for a Patient in their patient record.
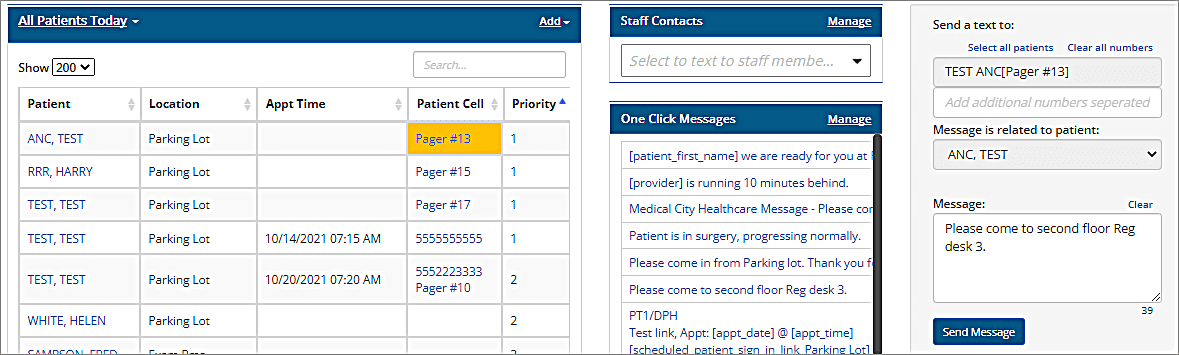
• The figure below shows a patient with an associated pager. Once the pager is selected, it is added to the “Send a text to” field. From there, a text message can be selected or typed in and then sent to that pager.
• The system only requires an Internet connection and runs completely through a web browser.
Note: For details on a supported paging system, please call PatientTrak Support @ (414) 455-6619.
Audit Activity
The Audit Activity reports will provide the User with information on who has logged in/out and what patient records have been accessed by which user. Audit information is also available for Kiosk login and status information, Area changes and Activity changes.